Weighted Boxes Fusion(Detection)

Weighted Boxes Fusion 방법 소개

png

밀이삭 영역 탐지 대회(Global Wheat Detection)
Weighted Boxes Fusion을 사용하여 Detection 문제에서 여러 모델의 예측 결과를 앙상블할 수 있습니다.

WBF(Weighted Boxes Fusion)

WBF는 Object detection 문제에서, 여러 바운딩 박스들을 앙상블하는 방법입니다. 모델은 이미지 내에 어디에(4개의 좌표값), 어떤 Class가(ex 사람/강아지/고양이), 얼마만큼의 확률(0~1)로 존재하는지 예측하게 됩니다. 만약 여러 모델에서 각기 다른 예측값들을 효과적으로 앙상블할 수 있다면, 모델의 성능을 더욱 높일 수 있을 것입니다.

기존 NMS(Non Maximum Suppression)Soft-NMS extenstion의 방법도 존재합니다. NMSSoft-NMS는 예측값의 일부를 제거하는 방식이라면, WBF는 예측된 모든 바운딩 박스들의 정보를 사용하여 결합하는 방식입니다. 아래 이미지를 보면, 빨간색 박스가 모델의 예측값이고 파란색 박스가 정답값입니다. NMS는 부정확한 박스를 모두 제외하고 하나의 박스만 남겼다면, WBF는 예측된 3개의 박스의 정보를 모두 사용하여 최종 예측값을 뽑아냈습니다.

WBF의 알고리즘을 간단히 요약하자면, 두 박스의 IoU를 계산하여 iou_thr 임계값을 넘으면 융합이 진행되는데, 융합 시 예측된 각 박스의 score에 따라 결과가 조정되는 방식입니다. 예측 박스들을 융합하는 알고리즘은 아래 참고 블로그에서 더욱 자세하게 알 수 있습니다.

png

WBF 참고 블로그 : https://lv99.tistory.com/74


패키지 불러오기

1
2
3
4
5
6
7
8
9
10
11
12
13
14
15
16
17
18
19
20
import numpy as np
import pandas as pd

import torch
from torch.utils.data import Dataset, DataLoader

import torchvision
from torchvision.models.detection.faster_rcnn import FastRCNNPredictor

import albumentations as A
from albumentations.pytorch.transforms import ToTensorV2
from glob import glob
import cv2
import matplotlib.pyplot as plt

import os

# Weighted Boxes Fusion 라이브러리
!pip install --no-deps '../input/weightedboxesfusion/' > /dev/null
from ensemble_boxes import * 

하이퍼파라미터 설정

1
2
3
4
5
args = {
    "TEST_DIR" : "/kaggle/input/global-wheat-detection/sample_submission.csv",
    "TEST_IMG_DIR" : '../input/global-wheat-detection/test/',
    "DEVICE" : torch.device('cuda' if torch.cuda.is_available() else 'cpu'
)}

데이터 전처리

데이터셋 만들기(불러오기)

  • sample_submission파일을 불러옵니다.
1
2
test = pd.read_csv(args["TEST_DIR"])
test
image_id PredictionString
0 aac893a91 1.0 0 0 50 50
1 51f1be19e 1.0 0 0 50 50
2 f5a1f0358 1.0 0 0 50 50
3 796707dd7 1.0 0 0 50 50
4 51b3e36ab 1.0 0 0 50 50
5 348a992bb 1.0 0 0 50 50
6 cc3532ff6 1.0 0 0 50 50
7 2fd875eaa 1.0 0 0 50 50
8 cb8d261a3 1.0 0 0 50 50
9 53f253011 1.0 0 0 50 50

데이터 로더 만들기

1
2
3
4
5
6
7
8
9
10
11
12
13
14
15
16
17
18
19
20
21
22
23
24
25
26
27
28
29
30
31
32
class WheatTestDataLoader(Dataset):
    def __init__(self, dataframe, image_dir, transforms=None):
        super().__init__()
        self.df = dataframe
        self.image_dir = image_dir
        self.transforms = transforms
        self.image_ids = dataframe['image_id'].unique()
        
    def __getitem__(self, index): 
        
        # Dataset의 index와 연동되어 이미지 각각에 대해 접근한다.
        image_id = self.image_ids[index] 
        image = cv2.imread(self.image_dir + image_id + '.jpg', cv2.IMREAD_COLOR)
        
        # 메모리 소모량을 줄이기 위해 데이터타입을 float32로 바꾼다.
        image = cv2.cvtColor(image, cv2.COLOR_BGR2RGB).astype(np.float32) 
        
        # keras에서는 이미지의 픽셀 값들을 0~1 사이로 자동적으로 표준화를 해주지만, 여기선 직접 설정해줘야 한다.
        image = image / 255.0
        
        if self.transforms :
            sample = {'image' : image}
            
            # ** : transforms 함수 안에 'image'라는 이름에 접근한다는 의미
            sample = self.transforms(**sample)
            
            image = sample['image']
        
        return image, image_id
        
    def __len__(self):
        return len(self.image_ids)
1
2
3
4
5
6
7
8
9
# transforms 
def get_test_transforms():
    return A.Compose([
            A.Resize(height=512, width=512),
            ToTensorV2()])

# collate_fn
def collate_fn(batch):
    return tuple(zip(*batch))
1
2
3
4
5
6
testset = WheatTestDataLoader(test, args["TEST_IMG_DIR"], transforms=get_test_transforms())
test_loader = DataLoader(testset,
                         batch_size=1,
                         shuffle=False, 
                         num_workers=4,
                         collate_fn=collate_fn)

모델 불러와서 Weighted Boxes Fusion 적용하기

모델 가중치 로드하기

  • 5번의 교차검증으로 학습된 5개의 모델을 불러옵니다. 불러오기 전, 학습했을 때의 모델 구조로 바꿔줍니다.
  • 추가하고자 하는 모델 가중치가 gpu 환경에서 학습되었기 때문에, 우리의 모델 역시 gpu 환경으로 맞춰줍니다. 만약 cpu로 예측을 하고 싶으면, map_location 옵션을 cpu로 설정합니다.
  • 또한 데이터를 예측 시에는 model.eval()옵션을 줍니다. 이 옵션을 사용하면 모델 내부의 모든 layer가 evaluation 모드가 됩니다. Evaluation 모드에서는 batchnorm, Dropout과 같은 기능들이 사용되지 않습니다.
1
2
3
4
5
6
7
def get_model(path):
    model = torchvision.models.detection.fasterrcnn_resnet50_fpn(pretrained_backbone=False)
    model.roi_heads.box_predictor = FastRCNNPredictor(1024, 2)
    model.load_state_dict(torch.load(path, map_location=args['DEVICE']))
    model = model.to(args["DEVICE"])
    model.eval()
    return model
1
2
3
4
5
models = [get_model('../input/model/fold0_model.tar'),
          get_model('../input/model/fold1_model.tar'),
          get_model('../input/model/fold2_model.tar'),
          get_model('../input/model/fold3_model.tar'),
          get_model('../input/model/fold4_model.tar')]

5개 모델의 예측 결과 저장하는 함수 정의

  • make_ensemble_predictions 함수는 5개의 모델의 예측값을 모두 저장하여 리스트 값으로 반환해주는 함수입니다.
1
2
3
4
5
6
7
8
# 앙상블 
def make_ensemble_predictions(images):
    images = [x.to(args["DEVICE"]) for x in images] 
    result = []
    for model in models: 
        outputs = model(images)
        result.append(outputs)
    return result

Weighted Boxes Fusion 함수 정의

  • WBF 적용할 때는, bounding box 좌표값들이 0~1 사이의 값을 가져야 합니다. 아래 코드에서 좌표값들을 (image_size-1)로 나누는 이유가 바로 그것입니다.
  • weighted_boxes_fusion 함수에서, iou_thrskip_box_thr 하이퍼파라미터를 이해해야 합니다.
    • iou_thr : IoU(Intersection over Union) 임계값입니다. 두 박스의 IoU를 계산하여, 임계값을 넘겼을 경우, config_type='avg'(디폴트 값) 방식으로 두 박스가 융합됩니다.
    • skip_box_thr class에 대한 예측 확률값(scores)이 skip_box_thr 임계값을 넘길 때만 가져옵니다.
1
2
3
4
5
6
7
8
9
10
11
12
13
14
15
16
17
18
19
# WBF 적용
def run_wbf(predictions, image_index, image_size=512, iou_thr=0.55, skip_box_thr=0.7):
    
    # (image_size-1)로 나누는 이유 :
    # WBF 적용 시 bounding box로 들어올 때, 이미지를 512로 리사이즈 했으므로 0~511사이의 값들을 갖는다. 이 값들을 0~1사이로 바뀌어야 한다.
    boxes = [x[image_index]['boxes'].data.cpu().numpy() / (image_size-1) for x in predictions]
    
    scores =  [x[image_index]['scores'].data.cpu().numpy() for x in predictions] # scores에 접근, gpu 연산 필요 없음!
    
    labels = [np.ones(x[image_index]['scores'].shape[0]) for x in predictions] # bb가 발견된 경우, 무조건 벼(class=1)
    
    boxes, scores, labels = weighted_boxes_fusion(boxes, scores, labels, iou_thr=iou_thr, skip_box_thr=skip_box_thr, conf_type='avg',)
    # iou_thr : IoU(Intersection over Union) 임계값이다. 두 박스의 IoU를 계산하여, 임계값을 넘겼을 경우, config_type='avg'(디폴트 값) 방식으로 두 박스가 융합된다.
    # skip_box_thr : class에 대한 값이 skip_box_thr 임계값을 넘길 때만 가져온다.
    
    # 다시 512 사이즈로 바꿔준다.
    boxes = boxes * (image_size-1)
    
    return boxes, scores, labels

Weighted Boxes Fusion 적용 결과 확인

1. Weighted Boxes Fusion 적용하지 않았을 때

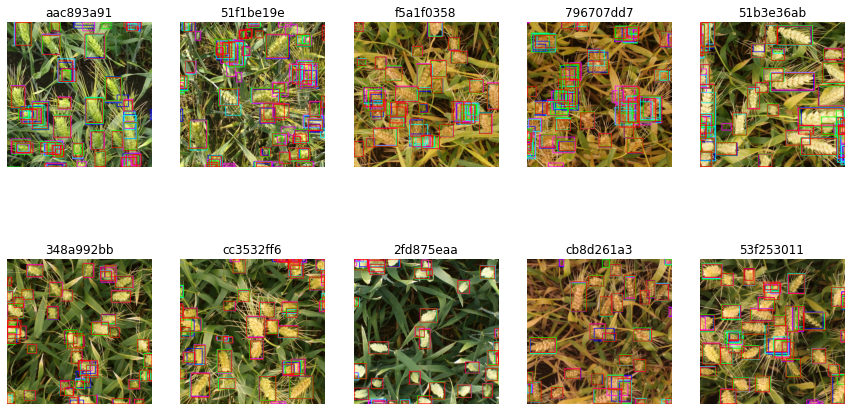
  • 5개의 모델이 예측한 바운딩 박스를 모두 plot 해봤습니다. 모델 별로 색을 다르게 하여 구분할 수 있게 했습니다.
  • 아래 결과 이미지를 보면, 5개 모델이 예측한 바운딩 박스들을 볼 수 있습니다.
1
2
3
4
5
6
7
8
9
10
11
12
13
14
15
16
17
18
19
20
21
22
# WBF 적용되지 않은 결과

fig, axes = plt.subplots(2, 5)
fig.set_size_inches(15, 8)
color = [(0,0,255),(255,0,255),(0,255,255),(0,255,0),(255,0,0)]

for i, (images, image_ids) in enumerate(test_loader):
    predictions = make_ensemble_predictions(images)

    img = cv2.imread(f"/kaggle/input/global-wheat-detection/test/{image_ids[0]}.jpg", cv2.IMREAD_COLOR)
    img = cv2.cvtColor(img, cv2.COLOR_BGR2RGB)
    for folds in range(len(predictions)):
        for index in range(len(predictions[folds][0]['boxes'])):
            
            # bbox 값의 범위를 이미지 사이즈(1024)에 맞춰준다.
            bbox = (predictions[folds][0]['boxes'][index]*2)
            bbox = bbox.data.cpu().numpy().astype(np.int32).clip(min=0, max=1023)
            xmin, ymin, xmax, ymax = int(float(bbox[0])), int(float(bbox[1])), int(float(bbox[2])), int(float(bbox[3]))
            cv2.rectangle(img, (xmin, ymin), (xmax, ymax), color[folds], 3)
    axes[i//5, i%5].imshow(img)
    axes[i//5, i%5].set_title(image_ids[0])
    axes[i//5, i%5].axis('off')

png


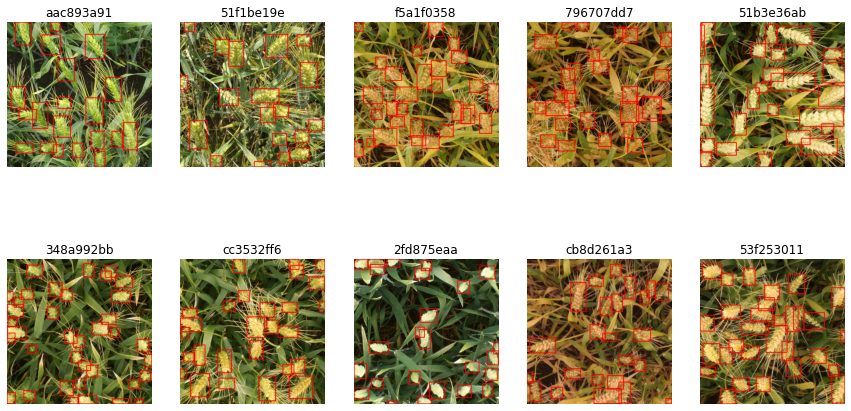
2. Weighted Boxes Fusion 적용했을 때

  • WBF를 적용한 결과입니다.
1
2
3
4
5
6
7
8
9
10
11
12
13
14
15
16
17
18
19
20
21
# WBF 적용된 결과

fig, axes = plt.subplots(2, 5)
fig.set_size_inches(15, 8)

for i, (images, image_ids) in enumerate(test_loader):

    predictions = make_ensemble_predictions(images)
    sample = images[0].permute(1,2,0).cpu().numpy()
    boxes, scores, labels = run_wbf(predictions, image_index=0)
    boxes = boxes.astype(np.int32).clip(min=0, max=511)

    for box in boxes:
        cv2.rectangle(sample,
                      (box[0], box[1]),
                      (box[2], box[3]),
                      (255, 0, 0), 2)

    axes[i//5, i%5].imshow(sample)
    axes[i//5, i%5].set_title(image_ids[0])
    axes[i//5, i%5].axis('off')

png


3. Weighted Boxes Fusion 적용 전과 후

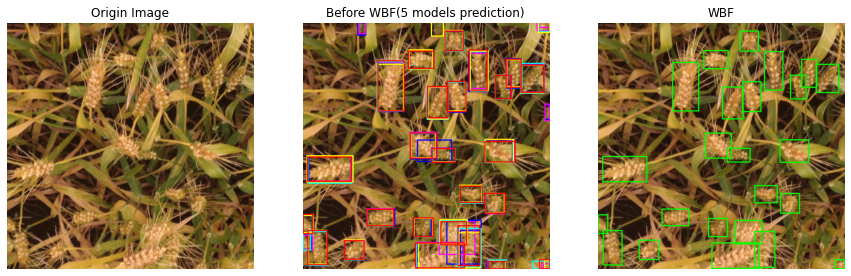
  • 왼쪽 이미지부터 원본, WBF 적용 전, WBF 적용 후의 이미지입니다.
1
2
3
4
5
6
7
8
9
10
11
12
13
14
15
16
17
18
19
20
21
22
23
24
25
26
27
28
29
30
31
32
33
34
35
36
37
38
fig, axes = plt.subplots(1, 3)
fig.set_size_inches(15, 10)
images, image_ids = next(iter(test_loader))


predictions = make_ensemble_predictions(images)
color = [(0,0,255),(255,0,255),(0,255,255),(255,255,0),(255,0,0)]

img = cv2.imread(f"/kaggle/input/global-wheat-detection/test/{image_ids[0]}.jpg", cv2.IMREAD_COLOR)
img = cv2.cvtColor(img, cv2.COLOR_BGR2RGB)
img_origin = img.copy()
img_wbf = img.copy()
for folds in range(len(predictions)):
    for index in range(len(predictions[folds][0]['boxes'])):

        # bbox 값의 범위를 이미지 사이즈(1024)에 맞춰준다.
        bbox = (predictions[folds][0]['boxes'][index]*2)
        bbox = bbox.data.cpu().numpy().astype(np.int32).clip(min=0, max=1023)
        xmin, ymin, xmax, ymax = int(float(bbox[0])), int(float(bbox[1])), int(float(bbox[2])), int(float(bbox[3]))
        cv2.rectangle(img, (xmin, ymin), (xmax, ymax), color[folds], 3)

boxes, scores, labels = run_wbf(predictions, image_index=0)
boxes = (boxes*2).astype(np.int32).clip(min=0, max=1023)

for box in boxes:
    cv2.rectangle(img_wbf,(box[0], box[1]),(box[2], box[3]), (0, 255, 0), 3)

axes[0].imshow(img_origin)
axes[0].set_title("Origin Image")
axes[0].axis('off')

axes[1].imshow(img)
axes[1].set_title("Before WBF(5 models prediction)")
axes[1].axis('off')

axes[2].imshow(img_wbf)
axes[2].set_title("WBF")
axes[2].axis('off')
1
(-0.5, 1023.5, 1023.5, -0.5)

png

중간 이미지는 5개의 모델에 대한 예측값들 모두 그려진 상태입니다. 모델이 각각 다른 가중치를 갖고 있기에 예측값도 조금씩 다릅니다. 이러한 예측값들을 모두 고려하여 WBF를 적용한 결과, 가장 오른쪽의 이미지와 같은 결과를 갖게 됩니다. 각 예측값의 score 값, 박스 간 IoU 값들을 기준으로 융합된 결과입니다.


제출하기

  • 최근 kaggle에서는 예측값이 담긴 csv만 제출하는 것이 아니라, 부정행위를 방지하기 위해 notebook 전체를 제출하게끔 하고 있습니다.
  • notebook으로 제출하기
      1. 오른쪽 콘솔에서 Internet 을 끈다.
      1. Save Version -> Advanced Settings -> Always save output
      1. submission 파일 이름은 반드시 submission.csv로 설정하기
      1. Save하여 제출

Submission 양식으로 바꿔주는 함수 정의하기

  • 대회마다 submission 제출 양식이 다릅니다. 이 대회에서는 아래와 같은 제출 양식을 요구하고 있습니다. 즉 image_id별로 [class_score, xmin, ymin, width, height] 의 양식으로 들어가야 한다는 것입니다.
1
test.head()
image_id PredictionString
0 aac893a91 1.0 0 0 50 50
1 51f1be19e 1.0 0 0 50 50
2 f5a1f0358 1.0 0 0 50 50
3 796707dd7 1.0 0 0 50 50
4 51b3e36ab 1.0 0 0 50 50
1
2
3
4
5
def format_prediction_string(boxes, scores):
    pred_strings = []
    for j in zip(scores, boxes):
        pred_strings.append("{0:.4f} {1} {2} {3} {4}".format(j[0], j[1][0], j[1][1], j[1][2], j[1][3]))
    return " ".join(pred_strings)

최종 예측

  • fasterrcnn_resnet50_fpn의 output은 자동적으로 labels, scores, boxes 값들이 dictionary 형태로 저장됩니다.
  • 또한 output의 boxes[xmin, ymin, xmax, ymax]로 나오므로, [xmin, ymin, w, h]로 처리해줘야 합니다.
1
2
3
4
5
6
7
8
9
10
11
12
13
14
15
16
17
18
19
20
21
# 예측 코드
results = []
for images, image_ids in test_loader:
    predictions = make_ensemble_predictions(images)
    for i, image in enumerate(images):
        boxes, scores, labels = run_wbf(predictions, image_index=i) # WBF 적용
        boxes = (boxes*2).astype(np.int32).clip(min=0, max=1023) # (1024,1024)로 이미지 사이즈 맞춰줌
        image_id = image_ids[i]

        boxes[:, 2] = boxes[:, 2] - boxes[:, 0]
        boxes[:, 3] = boxes[:, 3] - boxes[:, 1]
        
        result = {
            'image_id': image_id,
            'PredictionString': format_prediction_string(boxes, scores)
        }
        results.append(result)

test_df = pd.DataFrame(results, columns=['image_id', 'PredictionString'])
test_df.to_csv('submission.csv', index=False)
test_df.head()
image_id PredictionString
0 aac893a91 0.9948 58 0 115 162 0.9921 618 914 74 109 0.98...
1 51f1be19e 0.9933 605 87 156 166 0.9898 278 470 133 121 0...
2 f5a1f0358 0.9972 886 645 86 141 0.9964 544 272 107 113 0...
3 796707dd7 0.9935 710 823 107 101 0.9922 942 73 81 100 0....
4 51b3e36ab 0.9986 836 450 186 145 0.9982 234 644 93 155 0...

참고 자료

0%